October 25, 2013

DIY No-Sew Blanket

Hey guys!

Mom and I were in a crafty mood the other day and decided to take a trip to Joanne's.  We wanted to make some no-sew/ tie blankets to use when we transport dogs (they deserve something soft and cuddly for their long car ride!).  Plus, the fleece was on sale for $3.50 a yard!!  Needless to say, we bought a ton of the stuff.  I figured I would do a DIY post while I was working on the second blanket :)

This is a quick, easy, and really relaxing.  What a great way to start the weekend!

Just as an FYI, you can use any amount of fleece for this project; I would suggest using around a yard and a half, or even 2 yards if you are making this for a kid or as a throw.  Because these blankets are for dogs, I made them a bit smaller.

----------

Supplies


  • 1/2 yard of fleece for the front
  • 1/2 yard of fleece for the back
  • Scissors
  • Rotary cutter (optional, but very helpful)
  • Cutting mat
  • Ruler (preferably an acrylic one)
  • Maker


  • Instructions

    1. Pick out the patterns/ colors for your blanket.  Most people tend to use a colored fleece for the backside and a patterned piece of fleece for the front; I chose to use two patterned pieces just to make things more interesting.  There are whales on the front of my blanket and green chevron on the back.


    2. Lay out the pieces of fleece and make sure to trim off any access if they don't line up.  This doesn't have to be perfect, but make sure your lines are as straight as possible.  A rotary cutter and acrylic ruler comes in handy at this point (especially if you're like me and can't cut a straight line to save your life...).


    3. Using the ruler, measure out and draw a 2in x 2in square in each of the four corners of the fleece.  I used a paint marker and lightly drew on the fleece, but chalk, eyeliner, pencil, etc. will also work.


    4. Measure 2in up from the bottom of the fleece and make a mark.  Take the ruler and mark off every inch or so (see picture below).  These will be the tabs that you will tie off at the end of the project.  If you are making a bigger blanket, you can choose to make the tabs bigger, but I wouldn't recommend making them any smaller than 2in tall- if the tabs are too small, it's really difficult to tie them together.

    Continue making these marks around all four edges of the fleece.


    5. With your scissors or rotary cutter, begin cutting strips using the marks you previously made as a guide.  DO NOT START TYING YET!  Make sure you have made all the necessary cuts before you start knotting.


    6. After all of your cuts are made and your fleece is lined up, you can finally start knotting!  I like to tie all of my knots the same way because I'm a little OCD, but feel free to tie the tabs any way you want.  Also, I make double knots just to make sure everything is nice and secure, especially since I plan on washing these blankets every now and again.


    The Finished Blanket

    Charlee and Howie love their new blankets!  I'm glad I cut the fleece in half; it makes the perfect size for doggie blankets :)


    ----------

    I really enjoyed making these blankets, and I can't wait to start working on some more!  This project probably took me 30-45 minutes for each blanket, but it may take you a bit longer if you have never done this before.  Either way, it's a quick project and it's a ton of fun!

    Hopefully I'll talk to you guys again very soon :)

    Keri <3

    October 22, 2013

    NYC Big Bold Pluming & Shine Lip Gloss Review

    Hi!

    I recently received the Varsity VoxBox from Influenster (check out this post for more information), and I thought I would do a quick review on one of the products from that box. Influenster gives you a bunch of different tasks to complete once you receive a VoxBox; one of my tasks was to write a blog post about the NYC New York Color Big Bold Gloss. 

    ---------
    DISCLAIMER: I received these products complimentary for testing purposes from Influenster.com. This is not a sponsored post. All opinions are my own. 
    ----------
    Price


    Normally this gloss retails for $3.99. Considering it's from a drugstore brand, I would say that's a pretty fair price- it's not the cheapest gloss, but it's also not the most expensive gloss at the drugstore. Plumping glosses usually cost a bit more than regular glosses, so keep that in mind. Again, I think the price is definitely fair for the amount of product you are getting (0.38 fl oz or 11 mL). 


    Color 


    The color I received is called "Pleasantly Plump Pink (467)." It's a sheer, rosy pink with gold and maybe some rainbow shimmer (not glitter). In the sunlight, the rainbow shimmer is noticeable, but in indoor lighting, I see mostly golden shimmer. I think these are meant to be pretty sheer, but I would have liked to see a bit more color payoff. I most likely wear this gloss alone because it is so sheer; however, I'm sure it will look great layered over any pink lipstick or stain. 


    Applicator


    The applicator on this product is pretty unique. Like most glosses, it has a sponge doe-foot applicator, but this applicator is huge. It pretty much covers my whole lip when I apply the gloss (which isn't necessarily a bad thing). Basically, you just swipe once, and you're good to go! I don't feel like it picks up too much product, and I'm not constantly reloading the applicator. I literally take the cap off, swipe it on my lips, and I'm done. I really do like this type of applicator- it's easy to control where the color goes and you get the perfect amount of product each time. 


    Plumping Effect

    I've probably said this a million times, but I usually don't go for plumping glosses. The tingling sensation is not pleasant for me- it just feels kind of painful, most of the time. This gloss is different. After about a minute in the lips, it starts to tingle a little. I've noticed that the sensation stays around for awhile (maybe an hour or so?), but eventfully stops. This gloss claims to plump the lips by 50%. Honestly, I don't see that much of a change; the shine makes my lips look a bit fuller, but I won't say it actually plumps my lips and makes them look 50% fuller. 


    Other Thoughts

    The company says you can get about 4 hours of wear from this gloss, and I would say that's pretty accurate. The consistentcy of the product is pretty standard- it's sticky enough to cling to the lips and not feel greasy, but it's not too sticky. Like some glosses I've tried in the past, this gloss seems to get more tacky the longer you wear it. It's definitely not my favorite formula in the world, but it's not the worst either. 

    Just an FYI, I don't smell or taste anything offensive in this gloss. It has a chemical-type smell (I don't really know how to explain it...) in the packaging, but it goes away once it's on the lips. 


    Rating

    I would give this gloss a 3.5 out of 5 stars. I like the color, shine, and shimmer, but I wish it was a bit more intense. I don't really feel like it plumps the lips, even though there is a tingling sensation when you first apply it. I love the applicator, the price is on point, and the formula isn't bad. It really doesn't have a smell or taste once it's on the lips, so that's a plus for me. Overall, I like this gloss, and I may pick up some other colors just to see if they have better color payoff than this one. 


    Hopefully this helped some of you guys out :) Let me know if you have tried this gloss, or if you plan on trying it. I'd love to hear your thoughts!

    Keri <3

    Skin Care Routine

    Hey guys!

    Today, I was brainstorming and going through new blog ideas when I realized I had never posted a skin care routine blog. I know every beauty guru/ beauty blogger has probably already done a post like this one, but I figured I would give it a shot! I am by no means an expert or a beauty guru- this is just the routine that seems to work best for me :) 

    A few things to note- I have combination skin (I have an oilier t-zone but dry around the cheeks), which tends to get a bit more dry in the winter. My skin isn't too sensitive but I try to stay away from harsh products and things that have a ton of perfumes/ dyes/ chemicals. I've been following this particular routine for about two months now, and my skin has gotten a lot clearer.

    Now, let's get started!

    ----------
    1. Cleanse

    The first thing I do is wipe all the makeup off my face. I like to use the Pond Original Face Wipes, or the Simple Cleansing Face Wipes.  Most days, I only wear mascara, but I make sure to scrub every last bit off before I go to sleep. Also, if I'm feeling kind of lazy- let's face it, some days are just really tough- I'll only do this step. 


    I'm trying to wash my face everyday; I do see a difference when I follow this routine each night. Trust me, your skin will thank you later if you take care of it now! After I remove my makeup, I use my Clarisonc Mia2 to cleanse my skin; just for reference, I have the "Sensitive" brush head for the Clarisonic.

    I like to change my face wash every once in awhile, but I've been using the Clean & Clear Morning Burst Fruit Influsions Smootning Favoal Scrub in the "Yumberry/ Strawberry" scent (whew, that was a mouthful!).  


    2. Tone


    Toner helps remove any makeup, dirt, and/or oil that you may have missed while cleansing your face. It also restores the pH balance of your skin, so this step is definitely a necessity for me. Not all toners are created equal, but I've found that some of the drug store toners are actually pretty awesome! I've been loving the Neutrogena Oil-Free Acne Stress Comtrol Triple-Action Toner. It doesn't smell great (the smell doesn't linger for very long, though), but it doesn't burn my skin. I just out a bit of toner on a cotton pad and swipe it across my face. Let your toner dry/ skin in before moving on to your moisturizer. 

    Also, you don't have to buy any specific kind of cotton pad- they all work the same. I just happened to be at Ulta and figured I would pick some up while I was there. I normally buy the cheapest brand from Walmart. 

    3. Moisturize


    A good oisturizer is an essential, in my opinion. Honestly, I couldn't live without moisturizer- especially in the winter! I've been using the L'Oreal Youth Code Texture Perfector Serum Concentrate and the Youth Code Texture Perfector Day/ Night Cream. They're a bit on the pricier side for drugstore moisturizers, but I think they're worth the splurge. I've seen a huge improvement in my skin since I started using these! Obviously, these are both marketed towards more mature skin, but I'm using these more for prevention. It's easier to prevent premature aging/ wrinkles than trying to make them disappear later on, right? 

    ----------

    I hoped this helped! I'll talk to you all again very soon :) Until next time!

    Keri <3

    October 8, 2013

    Varsity VoxBox Unboxing

    Hey everyone!

    My Varsity VoxBox came in the mail today!! I'm so excited to share these products with you- this post will be an unboxing only (no reviews/ first impressions). Once I've tried out the products for a bit, I'll do a review post :) 

    Just for reference, here is a timeline for this VoxBox: 

    October 1: Recieved an email saying I qualified for the Varsity VoxBox

    October 10: Recieved tracking number and shipping conformation email

    October 12: Recieved the VoxBox


    So without any further ado, let's get started with the unboxing!

    ----------
    DISCLAIMER: I received these products complimentary for testing purposes from Influenster.com. This is not a sponsored post. All opinions are my own. 
    ----------
    The Box


    Surprisingly, this box was a lot smaller than the Mary Kay VoxBox I received a few months ago. I like the compact size- all the products fit nicely and nothing was squished. 


    The Details


    I'll list the names and prices of each product underneath the pictures, but here is the card with all of that information on it. This box is worth $19.16. Since it was completely free, I'd say that's an awesome deal! 


    Clearasil Daily Clear Refreshing Superfruit Wash ($6.49)


    Three small sample-sized pouches were included in the box. There is a decent amount of product in each sample- enough to wash your face once, I'm assuming. There is also a $1 coupon on the back of each sample. These coupons can be used on any Clearasil Daily Clear Refreshing Superfruit Wash, Scrub, or Pads. I've never used this particular cleanser, so I'm excited to see how it works for me!


    Airheads Xtremes Bites ($1.69)


    Honestly, I was really happy to see this candy included in my box! I'm not big on sour candy, but for some reason, I've always loved sour Airheads. These are "Rainbow Berry" flavored. To me, these are the perfect things to throw in my bag whether I'm going to school, the mall, a study session, or a movie. I can't wait to try these :)


    Kiss Nail Dress ($6.99) 


    I've used nail strips in the past, and I'm not really a huge fan. I'd rather paint my nails even if my manicure doesn't last more than a few days. That being said, these nail dresses may change my mind. Normally I don't care for the designs on these nail wraps/ dress, but these are absolutely adorable! They don't look childish or too cutesy- they look sophisticated and beautiful. I've never used the Kiss brand of nail strips, but we will see how it goes :) 

    I also recieved a coupon for $1 off any Kiss Nail Dress. 

    NYC New York Color Big Bold Plumping Shine Lip Gloss ($3.99)


    I feel like the people at Influenster know me so well- the color of this gloss is perfect! The color is "Pleasently Plump Pink Rose (467)." It's kind of a coral pink color with pink and silver shimmer. I don't know how I feel about the whole "plumping" claim (I normally don't like gloss that leave a tingle on the lips) but I will definitely give this gloss a try. I love that this is a full-size product! Also, I haven't seen this on shelves yet, so I feel kind of special haha


    Tide Pod (no price)


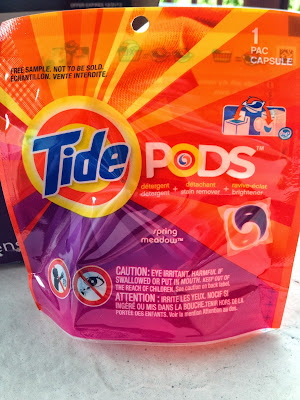
    Because there is only one pod, Influenster did not provide a price for this sample. I used to use Tide Pods when I was in the dorms- it was so much easier to take one or two pods with me instead of lugging around a giant bottle of detergent. I use the "Spring Meadow" scent in the liquid detergent from Tide so I know I'll love the scent of this pod.

    ----------

    Hope some of you guys found this unboxing post helpful and/or interesting. Check back soon for a full review of the items from this VoxBox. I'll talk to you all again very soon!

    Keri <3

    How To Clean Candle Jars

    Hey everyone!

    Fun fact- I like to scroll through Pinterest while taking a study break (I'm pretty sure most college kids do the same). Today, I saw some awesome DIY projects that only require glass candle jars and acrylic paint. Since I had some empty candles, I figured I would do a blog post about cleaning out the jars once you burn the entire candle. I don't know about you, but when I finish an entire candle I feel pretty accomplished :)

    This is a really simple process, but it can be time-consuming. It usually takes me around 10 minutes to fully clean each jar. The great thing about this project is it doesn't take skill or concentration, and you can probably find everything you need somewhere in your home. 

    So, on to the tutorial!

    Materials:
    - Candle jar
    - Butter knife
    - Dish soap
    - Cloth or rag
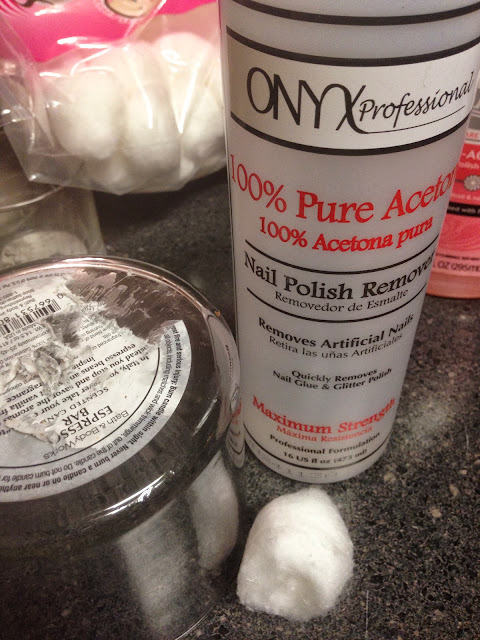
    - Nail polish remover (preferably with acetone)
    - Cotton balls
    - Water

    Instructions: 
    1. First, you want to make sure your candle is completely burned (no sense in wasting it!). There will most likely be 1/2" or so of wax left at the bottom of the jar. Place the candle in the freezer and let it sit for a few hours.

    2. After the candle is complete cooled, use a butter knife to break up the wax into smaller chunks. This shouldn't take a lot of effort or force. The pieces of wax should lift right out of the jar once you break them up a bit. 


    3. You may or may not need to do this step (I got lucky and didn't have to). If the glue from the wicks or the wicks themselves are stuck to try jar, just place some hot water in the jar and let it sit for a few minutes. Pour out the water, and you should be able to remove the wicks and/ or glue easily. 

    4. Peal off the stickers from the outside of the jar. The sticker on the front of my candle came off cleanly, but the bottom sticker gave me some trouble. I used the butter knife to remove most of the sticker. After that, I took a cotton ball soaked in nail polish remover and removed the rest of the stubborn sticker. 


    5.  There may be some residue left around the inside or outside of the candle. Simply take another cotton ball soaked in the nail polish remover and wipe off the residue. You should be left with a squeaky clean jar. 

    6. Wash the jar with warm water and soap to remove any stuck on glue or wax. I used a pretty abrasive dish cloth and Dawn dish soap. 

    7. Enjoy your clean glass jar, and unleash your creativity!!


    ----------

    I hope this tutorial was helpful and easy to follow! Be on the look out for more DIY tutorials- hopefully I'll make something out of these empty jars sometime soon :) Until then, thank for reading!

    Keri <3